Cruising Indigo
  • Home
  • The Crew
    • Our Dream
    • Our Search
    • Our Why
  • The Boat
    • Why PS34?
    • Bill Crealock
    • PS34 Specs
    • Pacific Seacraft
  • Upgrades
    • Misc >
      • Computer Table
      • Cockpit Step
      • Mast Pulpits
      • Instrument Panel
      • Spice Rack
      • Shelving
      • Dinghy
      • Interior Lighting
      • Exterior Lighting
      • Yacht Transport
      • Ladder
    • Sails >
      • Roller Furling
      • Standing Rigging
    • Wind Vane
    • Batteries
    • Radar & Wind
    • Engine Mods >
      • Engine Panel
      • Fuel System
      • Fluid Capacity Gauge
    • Head
    • Solar Panels
    • Watermaker
    • To Do List
  • Pics
  • Links
  • Blog

Varnish Vanity - Vanquished

12/7/2017

Comments

 
Picture
Yes, we finally succumbed to the sun. We painted our rails.
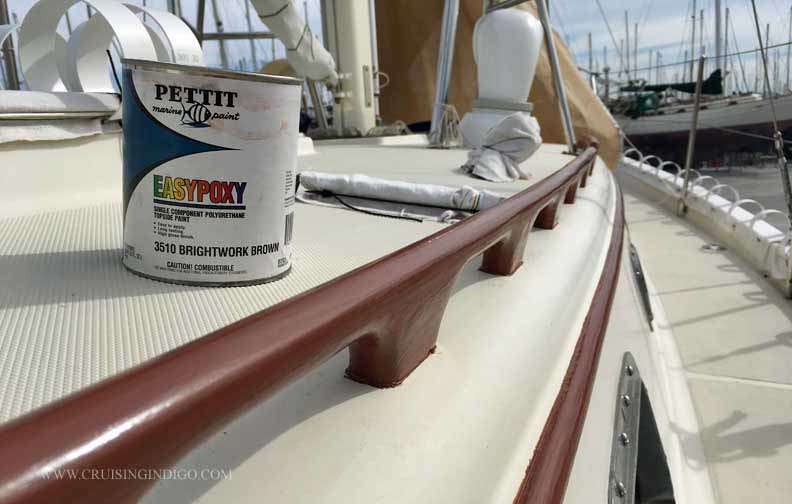
It has been a long road, but we have finally overcome our varnish vanity. Well, mostly. We painted our rubrail, eyebrows and handrails. Yup, you heard that correctly…painted. With epoxy paint. Not varnish, not Setol, not even Bristol Finish. Paint.

I know what you teak purists are thinking…
“Oh, the horror!”

…and what you cruisers are thinking…
“Told ya so!”

Varnishing our exterior teak is no longer practical. No longer desirable. It has become a never-ending battle. Sun vs. finish. Sun always wins. Always. The severe Mexico heat is our nemesis; it was never this bad in Maryland or even sunny California. We cannot varnish enough coats enough times during the year to keep it looking nice. We’re just wasting our time.

We knew better. We were told. We just refused to listen. Why? Varnish Vanity.

There’s something exquisite about a sleek piece of freshly varnished teak. It’s, quite frankly, sexy. The rich caramel color… the divine dark grain threading through layers upon layers of sanded and applied coats… that lustrous wet-look despite being bone dry. Whoowhee! We appreciate its arresting appearance; we recognize the enormous effort expended. If a boat could be sexually harassed, varnished teak gets the brunt of our attention. “Oooh, honey, look at that teak!” (Insert head nod + chin rub + raised eyebrows + sly smile.) “Niiiiiice.”

We loved the look, we didn’t mind the work. Now… we are minding the work.

Shedding Snake Skin
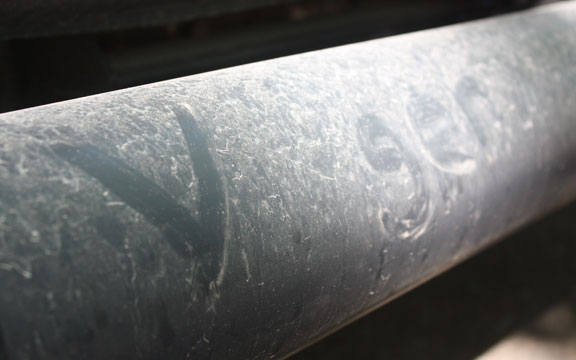
Our teak rubrails (along the hull) and eyebrows (paralleling the cream cabin top) cannot physically be covered. Subsequently, UV rays beat them to death year-round. Each time we return from a 5-month hiatus, we witness the consequence of this constant solar assault…one flaking layer after another. Our beautiful varnish looks like sunburned, peeling skin. Maddening. And gross.

Zebra Handrails
Our handrails are covered during the hot summer and stay relatively intact over 5 months. But the zip ties securing the cover causes thin shadows while the remainder finish lightens in color. Ugh, zebra varnish. Sunbrella covers would only delay the inevitable. Because when cruising, we traipse around up top and end up stepping on or kicking the handrails, even if we’re careful; we secure the dinghy to them, cinching the ropes tightly and grazing the finish every time; we slide watershoes and wetsuits under it to dry; we grab it to steady ourselves, nicking it with the flick of a wedding ring; our poor rails get whacked by the kayak, the dinghy, paddles, gas cans, snorkels, even my camera (don’t tell). So WHY do we keep doing all this work to keep them pretty when they are so difficult to maintain? They’re handrails. They’re meant to be grabbed and used and abused. Not to be pretty.

Wait, what?
I said, they’re meant to be used! Not to be pretty!

AH HA!
So, after three seasons in Mexico, we had an “Ah Ha” moment. This is what we’ve finally recognized:
Our boat is now a cruising boat, not a weekend boat; she’s a workhorse, not a showpiece; an actual home, not a model home.

Except, painting over varnish in the interests of practicality is akin to digging out the grass in your front lawn and replacing it with fake grass because you’re tired of the one full week of work it takes to cut it every 5 months. We hate that we’ve stooped so low. But we’ve come to terms.

Brightwork Brown
We learned about this particular paint, a Pettit brand called “Brightwork Brown”, from our friend Dave, formerly of sister ship “Swan”. A durable epoxy, this paint is used on everything from fiberglass to wood to metal. At a distance, one can mistake it for varnish; its coloring is similar to a dark varnished mahogany. But up close, one can definitely tell the difference…it’s opaque. No more wood grain. No more lovely caramel teak color. No more compliments.  But the upside is tremendous. Our yard neighbor painted his handrails a long time ago. I asked him how long before he had to coat them again? Ooooh. ‘Bout 5 years.

5 YEARS! Done.

OK, I’ve come to terms after hearing that. Brian, not so much. Painting over our teak made him miserable. (Just like that initial faux grass installation makes your stomach turn, right? Same thing.) But after finishing, he decided it didn’t look half bad. I think he can live with the decision.

We even got compliments by several yardbirds: Hey, is that varnish? Looks great!  Oh, I love you for saying that!

We Aren’t Idiots - Paint Goes OVER Varnish
(Brian) It is important to note that we did not ruin the teak. Varnishing it 2 years ago was the first necessary step to protect the wood. And we kept it varnished for as long as we could stand. Painting OVER the varnish keeps the paint from soaking into the wood. This important step makes it easy(er) to strip the paint later on and bring the teak back to its’ brilliant varnished luster.  
(Marya) In other words…we could bring the teak back to normal… if we wished… someday… (but we won’t - shhh).

Admit it. Switch it. Stop Stressing.
Varnish Vanity. It’s OK to admit we have it, but confessing is just the first step.
Switching to paint is the second stage. It’ll be OK. Just do it.
The final phase? After you’ve done the deed, release the remorse. Stop feeling like you’re a failure…that you’ve somehow let the boat down…that you’re not a real mariner without a spiffy varnish job…that you’ve been beaten by the elements.  
Vanquishing varnish vanity…it’s freeing!

Weeellll...Allllllmost...
Brian still refuses to paint the caprail. Fortunately, our makeshift cloth cover is doing its job. But guess what we’ll be doing soon. Varnish! Arrggh.
No matter. I’ll wear him down eventually. (Insert fingers tent + evil laugh.) Meh, heh, heh.
Comments

Van Mods

7/29/2016

Comments

 
Picture
Our final van modification? A name change - hereafter known as V-ger. Until we change our minds again...
Excited to be back messing about in his dad’s woodworking shop, Brian spent several weeks completing some pretty awesome and quite useful custom modifications before we set off for the great outdoors in our Winnebago Travato …
  • New Bump Stops (Sumo Springs)
The first fix-it item to take place - new Sumo Spring bump stops. Yes, the original ones were OK, but these new ones raised the back end another inch. A mere inch? Who cares? Well, our generator is positioned at the lowest point under the vehicle and only 6” off the ground. That’s a little too close for comfort. In fact, I once backed Brian into a parking spot and forgot that said low generator was behind the wheel base. That expensive generator juuuuuuust baaaarely whisked the top of the curb. After that near disaster, I am more vigilant. But having that extra inch has been really helpful for clearing higher curbs or road debris or small children (just kidding).

  • Battery monitor
One major reason we bought the Travato is its similar setup to a cruising boat. A solar panel on the roof allows us to boondock in remote areas without attaching to power for a day or two at a time. But doing so requires constant vigilance of power usage. The refrigerator runs exclusively off of the coach 12 volt batteries and is the largest battery draw. Our existing battery monitor is almost useless, blinking when full and in trickle charge mode, otherwise notating the voltage as it depletes which is the least accurate method of measuring. Worse, when the sun is charging the batteries, the current gauge only shows the solar panel output voltage, not the actual battery voltage.  So unless we cover up the panel or wait until dark we really have no idea what state of charge the batteries are at. Useless. As a rule, batteries should never be depleted below 50% charge; and if you want to keep your expensive battery bank healthy and lasting longer, an 80% minimum is best practice. (Brian gets jittery when it gets below 80.) So in order to view the more accurate ‘percentage’ method, Brian installed a Balmar Smart Gauge. (We have two friends with the exact same gauge on their boats.)
 
The entire installation took only one day (once we got all the parts) but most of that time was spent dinking around with the batteries. Each battery sits on a tiltable “shelf”, tucked up into the chassis and impossible to access without tipping at a really dicey angle. Brian raised the van on wood blocks (in order to crawl under the low clearance) and then used a motorcycle jack to keep the battery shelf from sliding out of its slot, hurtling this hazardous 75 pound hunk onto the pavement (or someone’s head). I got the job of making sure the jack didn’t roll away. Yeah, that means I also had to be under the elevated van – good times.
 
After drilling the necessary wire access hole in the bottom of the van and cutting an opening in the wall of the bed for the gauge, Brian ran electrical wires from the battery post into the interior. Our new meter works as expected and is reasonably precise, within a couple points plus or minus. As on the boat, Brian is once again content, now possessing this immediate information. Picture Mr. Burns from the Simpsons – a giddy “amp accountant” reveling in his “bank status” and dictating whether or not I can “afford” to watch an episode of Downton Abby. Loan… DENIED!

  • Bedside tables
One major feature lacking in our Winnebago Travato K is a dining table. We could eat from the captain’s chairs but we love lounging on our couch-beds. Aside from perching plates precariously on our laps, there’s no suitable place to rest a floppy paper plate or a drink. We didn’t like the idea of a cumbersome shared tabletop sprouting up from the floor between the already narrow walkway, even if it was removable. So we decided on two mini tray-tables.

Our TV-tables are made of three types of solid wood (sapelle, cocobola, bubinga) and finished with a clear gloss. Brian fabricated brackets from aluminum bar stock, using the existing window trim screws to avoid drilling any new holes in the van metal. Each table has two screws protruding from the back that slide and lock into these brackets. And there’s a single support leg that rotates down into a routed space for flat storage vertically under the bed using Velcro. Plenty strong for a drink and a plate of food, they only take a minute to set up or take down. For us, it’s the perfect solution. Now we can eat dinner while lounging on our respective beds watching Downton Abby (but only when we have sufficient amp credits or plugged into electricity!) Our ‘tiny house’ living room is complete.
​
  • Spicerack/backsplash
My original 1-1/2” backsplash is about as inadequate as using a garden hose for a parking curb. It doesn’t block water from splashing or food from falling into the inaccessible black hole in back of my tiny kitchen cabinetry. I’d read a Facebook post about a grape accidentally dropping into that abyss with the owner having to remove the fridge to get it out before it rotted. Yuck. But worse, the thought of what happens when you don’t see it fall? So Brian made me a beautiful 4-1/2” backsplash with a built in spice rack out of the same wood as the tables, sapelle. I insisted it be made removable so I could clean up liquid spills, lest it seep into/underneath the wood. So he crafted toggle clamps on the back side that loosen with a quick turn of the screw instead of drilling into the Corian. It works beautifully: my spices are easy-to-access and organized and the piece looks as though the van was born with it.

  • Windshield shades
We purchased and installed retractable front windshield shades from Eclipse Sunshades. The ones that came with the van are cumbersome to put up each night and take up tons of room in the overhead compartment. We found and copied this solution from the Winnebago Travato Facebook page, an extremely helpful tool filled with owner ideas for van modifications. These install vertically along the far left and right windshield edges and stay in place while driving. We don’t even notice any peripheral vision blocking. Closing them is a snap, just Velcro shut in the middle. While they are not blackout shades, they block the sun when parked for a few hours sightseeing and when stopped for the night they provide sufficient shielding from onlookers with no background shadowing visible. The ease of use and added storage space was worth the $50. They are so convenient, we have already discussed our future despair and solution when, inevitably, we damage one from too much use. Yup, buy another set!  

  • Shower curtain
The shower curtain that comes with the van uses snaps that fasten around the upper portion of the bathroom. Lame. We figured it would be annoying to put up and down every time. So Brian installed a bendable slide utilizing about 30 spring grips that attach to the curtain top. Now we can slide the curtain in a U-shape around the shower basin and rope it off when done, leaving the curtain in place at all times. It IS a much better solution, but not as necessary so far since we have been staying at State Parks with shower facilities or relatives houses. We plan on using it much more next summer when we head out west boondocking in isolated wilderness.

  • Sewer hose holder/”bumper step”
Brian really wanted to upgrade to a Rhino sewer hose as the one that came with the Winnebago was (pardon the pun) crappy. It wasn’t long enough. It’s rather thin and chintzy. There’s no 90-degree bend at the end allowing proper fit into the sewer hole without stepping on the end to keep it in place (I don’t want my shoe anywhere near that sewer hole.) But the most important thing…there’s no “pee-viewing window”. While watching your pee+ stream from the tank into the sewer seems a bit (OK a lot) gross, consider the alternative…
 
Just today, we witnessed what we recognized as inevitable with the windowless hose: camper thinks sewage is done streaming, camper unhooks hose prematurely from trailer, camper eyes go wide as he sees his shit-stream is NOT done flowing and actually is still flowing quite profusely, stuff splashes everywhere (on the ground, the trailer, the camper), camper swears loudly, camper fumbles to reattach, camper (grumbling) resolves to buy a better hose. Who hasn’t done this to one degree or another! It only took us one use of the crappy hose to agree this was a priority. After watching that spectacle, we our looked at each other and smirked. WHO wants a crappy crapper hose? Not us.
 
But storing the additional 90-degree attachments and the longer 15ft hose was problematic. Brian researched and found the adjustable Sanitube storage tube to hold everything in a sealed container. But he could find no good way to attach it under our van. We really didn't want to store it IN the van (gross) and didn't desire the added length, weight and cost of a Stowaway trailer hitch storage box. So Brian came up with this idea of a “bumper” of sorts, fabricating a 5ft wide bracket made from 1” square steel tubing that attaches the Sanitube to the trailer hitch. As an added feature he welded a step on top to protect the tube, making it easier when getting in and out the back door. He painted the whole thing black to match the tube and added non-slip tape to the step (‘cause he thinks of everything). The whole contraption sticks out only 7 inches from the bumper. After having used it many times now, we are very pleased with our new gadget; it makes an icky job much less so. Plus, we will never be THAT guy.

 
V-Ger
Amid Brian’s month-long van modification session and the beginnings of my TransUnion death debacle (see last post), we squabbled over what to rename the van. Alas, Brian didn’t like the name Winndigo. Too hard to say. What?!  I thought it was cool, whatever. Brian liked Silver Bullet (no way, too much like the Budweiser slogan… wait, I think that IS the slogan). I wanted to name it KYLE: Kickass Yuppie Liveaboard Expediter or TIMMY: Travato Inspires More Miscellaneous Yondering. But Brian didn’t like my Southpark references. Sigh.
 
What about V-Ger? From the first Star Trek movie “The Motion Picture” (1979 and yes, the worst one) in which the newly self-aware NASA Voyager 6 satellite assumes its name is “V-Ger”, rather than Voyager, because moon dust covered up the “oya” portion of its name on the ships’ hull.  Not such a smart satellite. Yeah, we just spoiled the surprise ending if you haven’t gotten around to watch the 40 year old movie yet. Anyway, we feel it’s fitting:
  • our silver van looks a little sleek and space-shippy;
  • it’s intended purpose is for us to voyage where we haven’t gone before;
  • while self-aware satellites (or vans) usually are NOT a good thing, self-aware humans ARE… and so we shall strive, in honor of Spock;
  • and finally, if you don’t get a little dirt on your space vehicle, you haven’t really explored!
Comments

what a rack!

4/27/2014

Comments

 
Picture
Brian: "Why wouldn't you want a new rack?"
Me: "But the rack I have is just fine honey."
Brian: "But if I got you a new one wouldn't you be happier?"
Me: "No, but I'm guessing you would be."

So...I caved. Brian just got me a new rack.
Don't judge me. It's a beautiful thing. See for yourself. All natural, perfect construction, a real head-turner. Why didn't I ask for this years ago?

Brian made me this awesome spice rack out of teak and just installed it last week. A line of shock cord holds the taller jars while allowing some play to get them in and out. I have such a talented husband.

Above the stove was the perfect unused space to apply more storage. I have over 50 jars of spices at home, so I am happy this new gadget will allow me to bring a few more from my collection. I already have a small cupboard to the side of the sink so this effectively doubles my spice storage space.
I love my new rack!

Comments

    RSS Feed

    Archives

    March 2018
    December 2017
    November 2017
    October 2017
    July 2017
    June 2017
    May 2017
    April 2017
    March 2017
    February 2017
    January 2017
    December 2016
    November 2016
    October 2016
    September 2016
    August 2016
    July 2016
    May 2016
    April 2016
    March 2016
    February 2016
    January 2016
    December 2015
    November 2015
    September 2015
    August 2015
    July 2015
    June 2015
    May 2015
    April 2015
    March 2015
    February 2015
    January 2015
    December 2014
    November 2014
    October 2014
    September 2014
    August 2014
    July 2014
    June 2014
    May 2014
    April 2014
    March 2014
    December 2013
    November 2013
    October 2013

    Categories

    All
    Agua Verde
    Air Conditioning
    All-inclusive Resort
    Anchoring
    Bahia Amortajada
    Bahia Cardonal
    Bahia Cobre
    Bahia Concepcion
    Bahia Salinas
    Baja Ha Ha
    Baja Ha-Ha
    Balandra Beach
    Ballandra Bay
    Balloonfish
    Baluarte Bridge
    Bashing
    Boat Refrigeration
    Boatwork
    Boatyard Fatigue Syndrome
    Bottom Paint
    Bullfight
    Campervan
    Cancun
    Candeleros Bay
    Canvas
    Carlsbad Caverns
    Carnaval
    Chainplates
    Charleston
    Chichen Itza
    Cliff-Divers
    Cockpit Table
    Containers
    Cortez Angelfish
    Crossing
    Cruising Friendships
    Culture
    Cutlass Bearing
    Destination Wedding
    Dinghy
    Dodger
    Dolphins
    Driving In Mexico
    Dry Storage
    Durango
    EcoBaja Tours
    El Burro Cove
    Ensenada Grande
    Fireworks
    Fish
    Flat Tire
    Food
    Fun Baja
    Georgia
    Grandpa
    Gray Whales
    Guaymas
    Gulf Of California
    Haulout
    Hermosillo
    Hoffmaster State Park
    Holiday-inn-express
    Honeymoon-cove
    House
    Hurricane Blanca
    Hurricanes
    Interlochen
    Isla Carmen
    Isla Coronado
    Isla Danzante
    Isla El Coyote
    Isla Ispiritu Santos
    Isla San Francisco
    Isla San Jose
    Jumping Mobular Rays
    Kilometer 21
    La Paz
    Leelanau
    Life Raft
    List
    Llantera
    Loreto
    Los Gatos
    Los Islotes
    Los Osuna
    Marina Costa Baja
    Marina El Cid
    Marina Palmira
    Marina Seca
    Mayan
    Mazatlan
    Mexican Food
    Mexican Health Care
    Mexico
    Michigan
    Mobular Rays
    Mountains
    Mouse Aboard
    Moving Onto A Boat
    Mystical River
    New Orleans
    Nogales Border Crossing
    Nopolo
    Octopus
    Okefenokee Swamp
    Onilikan
    Pancho Villa Museum
    Pensacola
    Pima Air & Space Museum
    Playa Algodones
    Playa Bonanza
    Playa Coyote
    Playa Santa Barbara
    Playa Santispac
    Playa Santo Domingo
    Posada Concepcion
    Puerto Escondido
    Puerto Lopez Mateo
    Punta Chivato
    Punta Mangles
    Punta Perico
    Punta Pulpito
    Punta Salinas
    Radar
    Renaissance Festival
    Retinal Tear
    Retirement
    Rigging
    RV
    Safety
    Sailing
    Sailing Mexico
    San Carlos
    San Evaristo
    San Jose Channel
    San Juanico
    San Marte
    Sapphire NOW
    Savannah
    Sea Fireflies
    Sea Frost
    Sea Lions
    Sea Of Cortez
    Sea Turtles
    Serenbe Playhouse
    Shells
    Sleeping Bear Dunes
    Sleepy Hollow
    Snorkeling
    Stainless Steel
    St. Augustine
    Stingrays
    Storage
    Tacking
    Teak
    Tennessee
    Tequila Factory
    Texas
    Timbabiche
    TransUnion
    Tucson
    Tufesa Bus
    Tulum
    Underground River Swim
    Varnish
    Waterfalls
    Watermaker
    Whale Shark
    Wilderness State Park
    Wind Generator
    Windows
    Windvane
    Wing-on-Wing
    Winnebago Travato
    Woodworking

Powered by Create your own unique website with customizable templates.